Controlling a Hunter Ceiling Fan with Arduino
Costco is Life
There is no doubt that Costco has a cult following. I almost have no shame in admitting that I am a happy member of it. Before getting a Costco membership, I couldn't think why I would ever need one. Now when I enter the store, every single thing seems like a reason to get a membership, and I leave spending more than I ever anticipated. That doesn't mean there haven't been some amazing purchases. One that was absolutely essential was a Hunter Remote Controlled Ceiling Fan. The master bedroom in my house didn't have a fan installed. The bedroom is on the second floor so even with great air conditioning it can get a little warm during the summertime. The installation was easy. It only required a couple of hours of work and a few trips to the attic. Now the fan keeps the room feeling cool and was a huge quality of life improvement. (As a side note, I do recommend not installing a fan during a hot summer afternoon.)
The only downside about the fan is that the switch was only wired for a light. This means you have to leave the light switch for the room on, and you can only operate the fan through the remote control. Since there is only one remote control, you either have to mount it next to your light switch so you can use it as you come into the room (this looks tacky) or you keep it in someone's nightstand. There is always the possibility that you will forget where you put it or, if you have kids, there is a good chance they will have ran off with it somewhere. These things got me thinking about how I could hook up the fan to my home automation system. Not only would this allow me to use Alexa, Google Assistant, or my phone to control the light but I could also have the fan turn on at a certain time each night and turn off in the morning. I could also automatically control the fan speed based on the temperature of the room. It just sounded like a fun hobby project to get this all working (and it was!).
Before doing this yourself, you may want to look into several commercial products that would solve this problem already. The most expensive being a Bond Home (I wasn't interested in paying $100 to automate my fan, if I had many IR / RF Link controlled devices then I would have considered this more), or a more affordable option the Sonoff RF bridge. I also considered just buying a smart fan from the beginning. That would have been the most expensive option as I couldn't find a good smart fan for less than $150 more than my Costco fan. I had these items on my want list for a while but it was never a high priority and eventually, I decided just to build it myself.
I should add a disclaimer here before going through the steps I took to automate the fan. I am an Arduino noob. This is the first project that I have done with an Arduino so there may have been an easier and better way to accomplish my goal. As always, any feedback on the code or solution is welcome. This same overall process should also work for other RF or IR controlled devices.
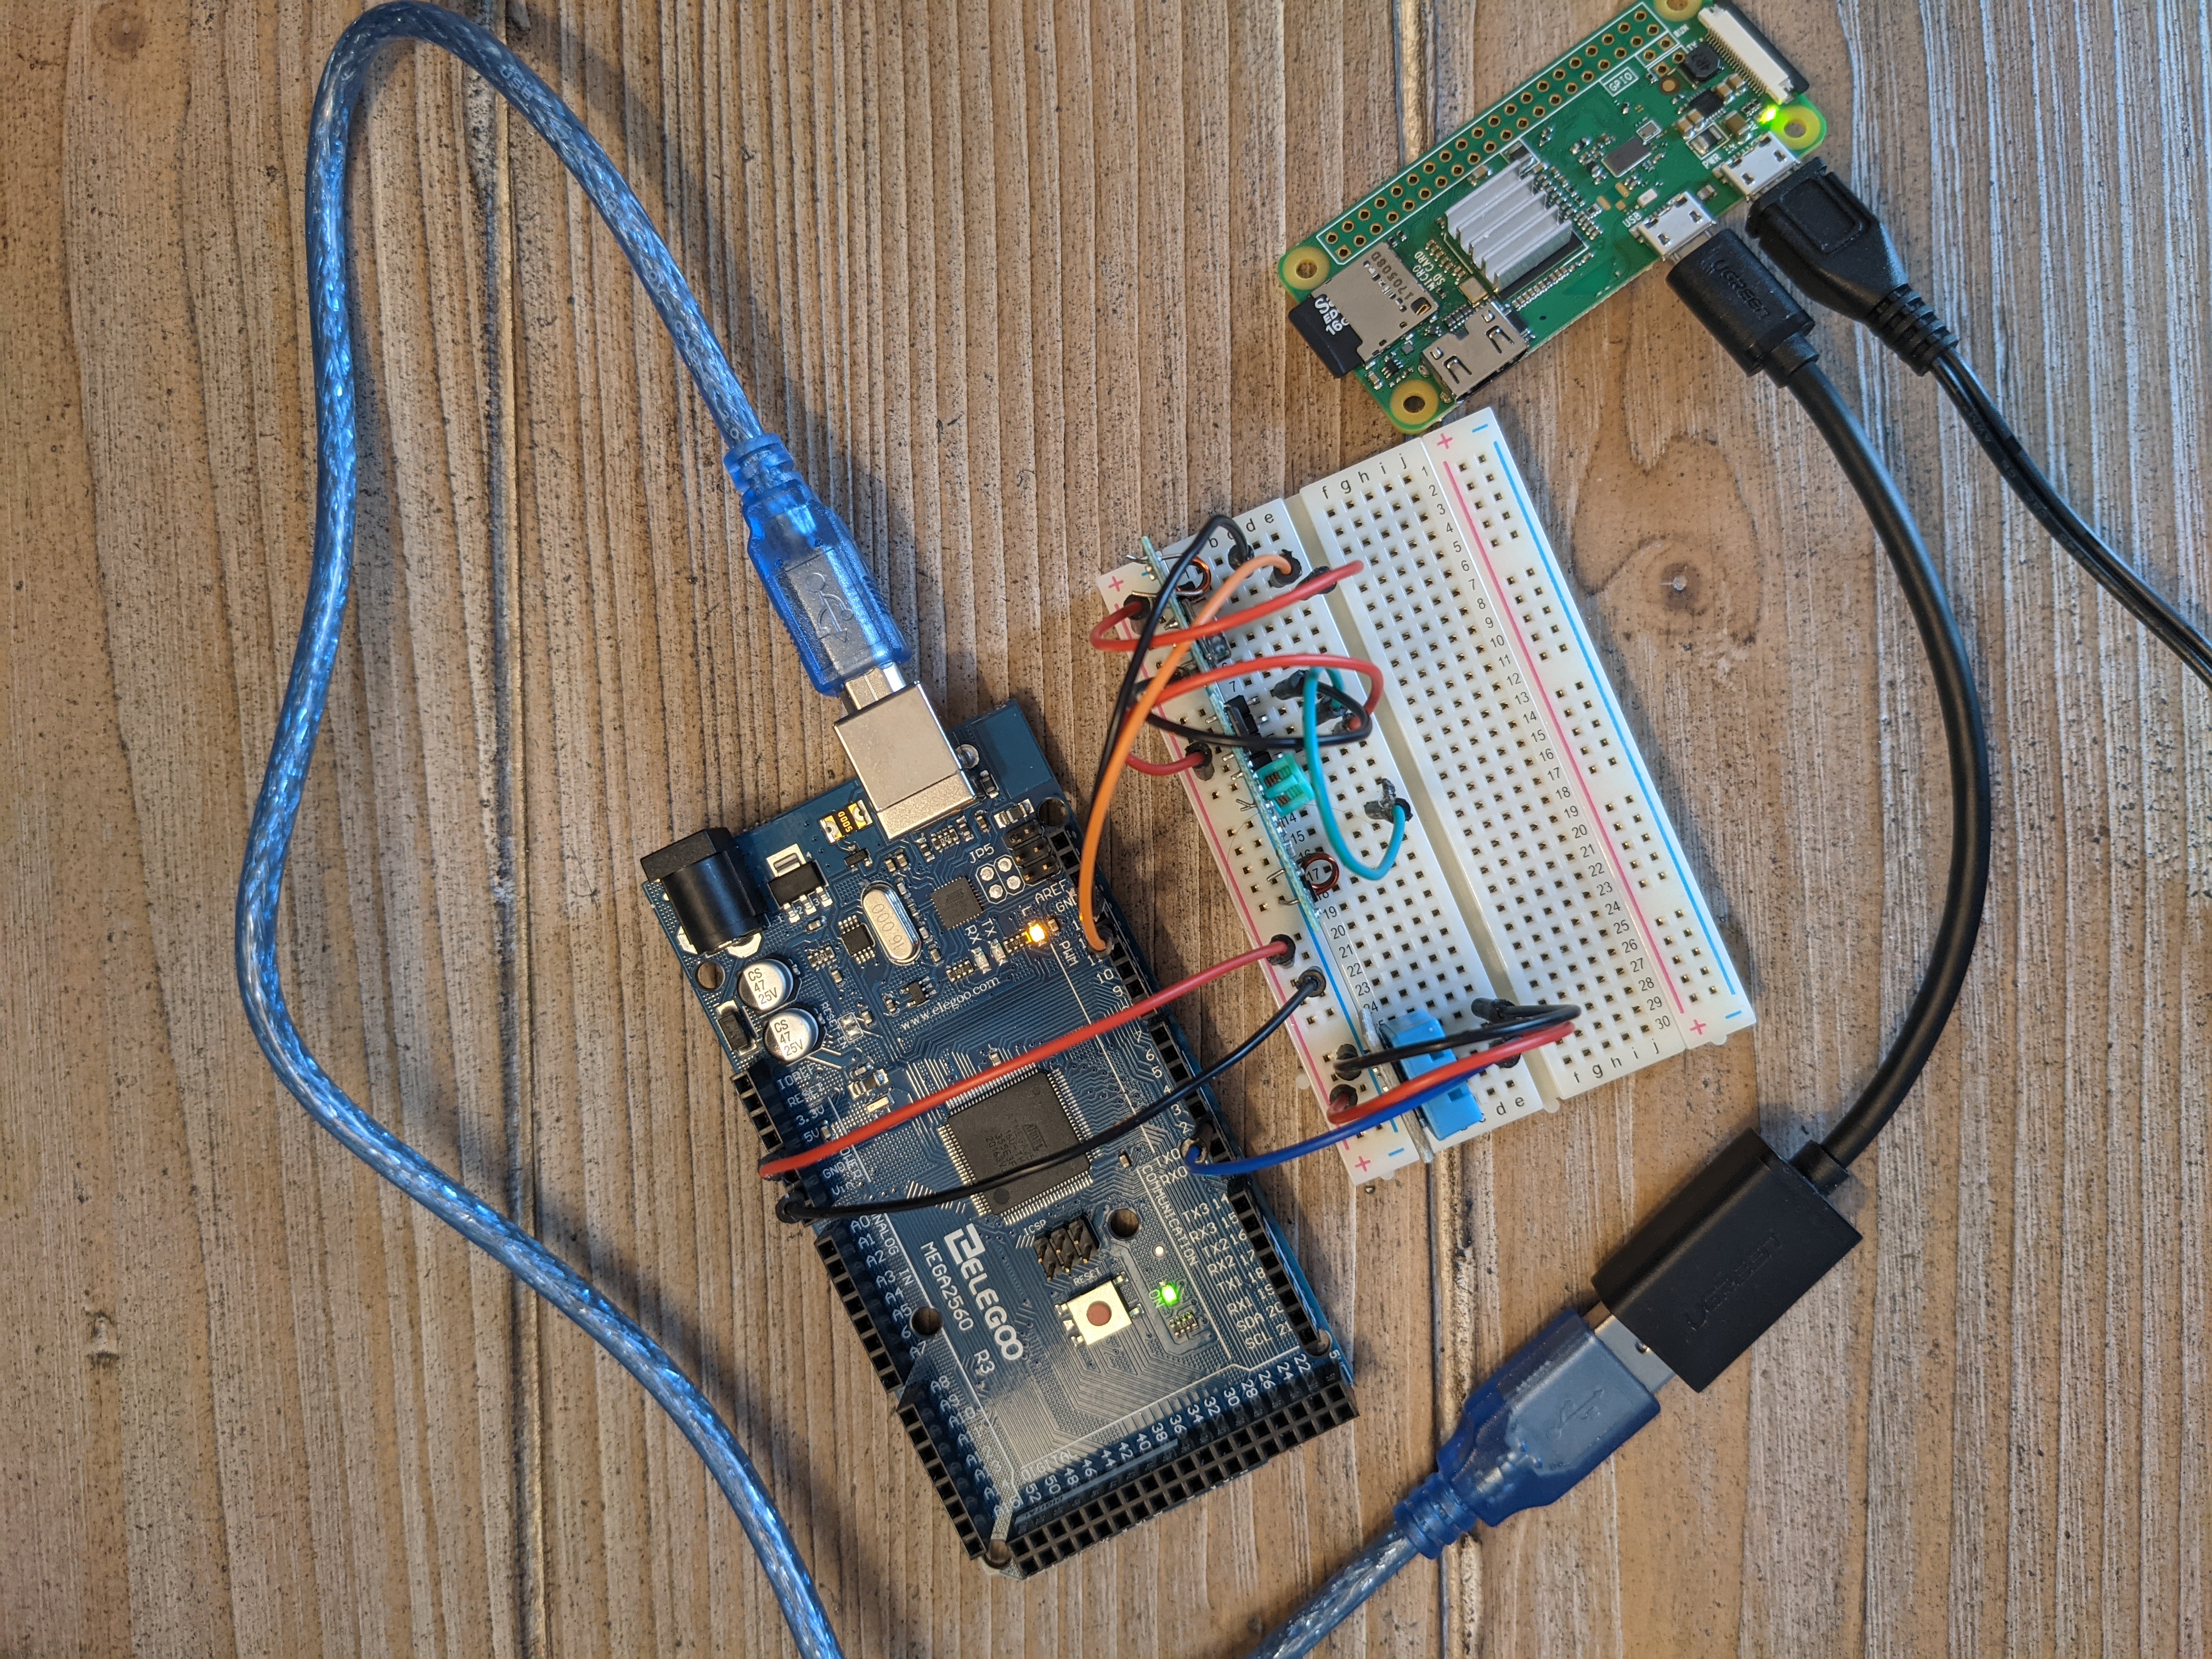
This is what the final product looked like. I used an Arduino Mega 2560, a Raspberry Pi Zero W a Temperature/Humidity Sensor, and an RF transmitter and receiver. The total cost of the project was $30 if you don't already have any of the supplies.
The Arduino Mega 2560
I first started working on the Arduino controller. I wanted the controller to do two different things. First, to send signals to the fan in place of the remote, and second, sample temperature and humidity sensors. This part of the project involved some trial and error since it was my first time doing any kind of hardware project like this. It was easy to get the temperature and humidity sensor set up, but I ran into a couple of issues when I was trying to record the remote signal. The first thing I learned was that IR and RF are not the same. I had an IR receiver ready to go and was able to record my TV remote. It hadn't occurred to me yet that the remote wouldn't be using IR to send signals to the fan. I got my remote and tried to record and the IR receiver didn't pick anything up. I then flipped over the remote and saw a sticker on the back say it was using 434 MHz. IR transmits at around 38 kHz. After a quick google search, I learned what RF was and had purchased a cheap RF transmitter and receiver. I purchased the parts of Amazon for $4. That is probably more expensive than they should be but I got them in less than 12 hours so it was worth it.
The next thing that I learned was that the RF receiver only had a range of a couple of centimeters. I didn't realize this at first and spent a long time trying to figure out why I couldn't detect a signal. I also had some issues getting popular Arduino libraries to work. I tried RadioHead, VirtualWire, RCSwitch, and RFreplayEPS. None of them were getting anything. The problem was that my remote was using a proprietary encoding that none of the libraries knew how to listen for. I ended up recording the time in microseconds between the changes in high and lows on the pin connected to the receiver. I pulled the code for this mostly from the RFreplayEPS library but I did do several things to tweak it. It was written for a different board that has a file system where it would store the commands. There were also issues with some differences in variable sizes that caused the library to misbehave on my board. Once I had worked out those things I was able to record the signals I needed. It took a couple of attempts to figure it out because I was picking up a little interference, but I was consistently getting recordings 468 internals long, that's when I knew I had found the right signals. I stored those in arrays hardcoded at the beginning of my script and then figured out how to transmit them. The transmitter worked great inside of the same room. I didn't test from another room but I read that an antenna connected to the transmitter would expand the range to a whole floor of a house.
The code for the Arduino and Raspberry Pi can be found in this repository.
The Raspberry Pi Zero W
My Arduino Mega 2560 does not have a built-in WiFi connection, so I needed to either get an Ethernet shield for the Arduino or use my Raspberry Pi Zero W and connect the two. The Pi Zeros are super cheap and work great. The Pi has two scripts that make all the magic happen. The first is a webserver written in ruby using the Sinatra gem. Sinatra is a lightweight server and since I'm a ruby fan it allowed me to write the server in just a couple of minutes. Essentially I just needed a get endpoint for each entity (fan, light, and each sensor), and then a post endpoint for the light and fan to update their state on command. I did use a SQLite database to persist the state across reboots.
I paired the two devices together with USB. I read that this was a lot easier than doing it with the GPIO pins but there are several different ways that you can connect the two devices.
The second script on the Pi monitors the serial connection from the Arduino which sends temperature and humidity updates every second. The Arduino sends the data in JSON format which is parsed by the script and then updated in the SQLite database if the state is different than what is already stored there.
The last step was to set up systemd to keep both of these scripts running on the pi. I created two simple services and installed them. All of the scripts and services can be found on Github as well.
Home Assistant Integration
I've been using Home Assistant, an open-source home automation platform, for two years now. There are integrations for almost all smart home devices out there but it is also really easy to write a custom integration for the platform. I followed the docs here to get the files set up for my custom component, they have a script the generates all the boilerplate things for you. Then I just needed to add three files, fan.py, light.py, and sensor.py. Home Assistant best practices say you should pull all your API logic out into a separate Python library but since this was a personal component that seemed like a lot of overkill. For the most part, I just needed to fill in a couple of methods with the API calls to the server running on my Raspberry Pi Zero W to get the state and send the commands to update the state. I already had Home Assistant set up with both Alexa and Google Assistant (which isn't very difficult to do. Alexa took like 20 minutes, Google was more like an hour...) and just needed to add the new devices to my Home Assistant front end which also is super easy. The only weird part of the development process was that I did clone the Home Assistant Core repository and wrote the code there because I could look through other classes to see what I needed to implement and auto-complete worked in my editor. After I had tested the files, and they were good to go, I moved them into the repository for all my home assistant personal configuration.
Here is an example of one of the Home Assistant code to get the fan working.
"""Platform for fan integration."""
import logging
import requests
import voluptuous as vol
from typing import Any, Optional

import homeassistant.helpers.config_validation as cv
from homeassistant.components.fan import SPEED_OFF, SUPPORT_SET_SPEED, SPEED_LOW, SPEED_MEDIUM, SPEED_HIGH, FanEntity, PLATFORM_SCHEMA
from homeassistant.const import CONF_NAME

_LOGGER = logging.getLogger(__name__)

# Validation of the user's configuration
PLATFORM_SCHEMA = PLATFORM_SCHEMA.extend({
  vol.Required(CONF_NAME): cv.string
})

def set up_platform(hass, config, add_entities, discovery_info=None):
  """Set up the sensor platform."""
  name = config[CONF_NAME]
  add_entities([BedroomFan(name)])

class BedroomFan(FanEntity):
  """Representation of a fan."""

  def __init__(self, name):
    """Initialize the BedroomFan"""
    super().__init__()
    self._name = name
    self.entity_id = f"fan.{name}"
    self._url = f"http://fan-controller.home/fan/{self._name}"
    self._speed = SPEED_OFF

  def set_speed(self, speed: str) -> None:
    """Set the speed of the fan."""
    self.set_state(speed)

  # pylint: disable=arguments-differ
  def turn_on(self, speed: Optional[str] = None, **kwargs) -> None:
    """Turn on the fan."""
    if speed:
      self.set_state(speed)
    else:
      self.set_state('on')

  def turn_off(self, **kwargs: Any) -> None:
    """Turn the entity off."""
    self.set_state('off')

  def set_state(self, state):
    """Make API call to set state of the light"""
    response = requests.post(url=self._url, json={"state": state})
    if response.ok:
      data = response.json()
      self._speed = data['state']

  @property
  def is_on(self):
    """Return true if the entity is on."""
    return self._speed not in [SPEED_OFF, None]

  @property
  def speed(self) -> Optional[str]:
    """Return the current speed."""
    return self._speed

  def update(self):
    """Fetch new state data for this fan."""
    response = requests.get(url=self._url)
    if response.ok:
      data = response.json()
      self._speed = data['state']
    return self._speed

  @property
  def speed_list(self) -> list:
    """Get the list of available speeds."""
    return [SPEED_OFF, SPEED_LOW, SPEED_MEDIUM, SPEED_HIGH]

  @property
  def supported_features(self) -> int:
    """Flag supported features."""
    return SUPPORT_SET_SPEED
Future Improvements
The only issue with the set up now is that when someone pressed the old remote controller manually the fan or light can get out of sync with the state shown on the server. This could be easily fixed by adding an antenna to the RF transmitter and hooking that up to another Arduino and listening for the remote control button presses and updating the server state accordingly, but for the most part that doesn't happen as it's far easier for us to use Alexa than get up and go find the remote somewhere. Also, I don't think that I could receive and transmit from the same Arduino so I would need to get another one. Overall though, I have been using this controller and it has been working great and already made life easier.